Friday, October 21, 2011

Hi, All!

I'm hosting a quick and easy online party and I would love to share some great gift ideas with you. My friend, Anne Dering, is an Independent Demonstrator with Uppercase Living (a home decor company) and they have just launched two fun catalogs. Uppercase Living is a company whose mission is to uplift and inspire others through beautiful vinyl decor and meaningful jewelry. Anne's website is www.uplift-and-inspire.com


The Blume Jewelry line of Uppercase Living blends inspiring messages with artisan jewelry. Shop for any mood, any personality - elegant, graceful, or bold. Shop for any lady in your life - including something sweet and pretty from our children's collection. Each gorgeous collection can be found here: http://tinyurl.com/blumejewelry


The Holiday Edition Catalog features exclusive hip and heartfelt products that will bring good cheer to every gathering. From decorations to gifts, from Halloween to Christmas, you can shop from this great catalog here: http://tinyurl.com/holidaycatalog2011


When you shop, associate your order to my online party. To do this, when you're ready to check out, click on the button "Associate With Open House". This button is found in the top below my friend Anne's picture. A drop down list will appear. Find the button for my online party and select it (Stephanie H.). Then, check out! :) Your order will be sent directly to you.

A virtual copy of all the Uppercase Living catalogs can be found here: http://annedering.uppercaseliving.net/CatalogPreview.m
Simply click on the button "2011-2012 Catalog" to see the options for the Blume jewelry and the Holiday catalogs.
Other fun information: You will receive one exclusive free gift if you spend $60, two gifts if you spend $80 and three gifts if you spend $100. This quick and easy party will be a fun way to find something beautiful and meaningful for yourself AND the special people on your Christmas List!! My party begins now and will end at midnight on October 28thYou will definitely have all your orders back with enough time for wrapping your Christmas gifts.
 

Monday, October 3, 2011

What to do...

Have you answered the same question a million times (regarding some homeschooling thing)???? Yeah, me too.  So what do I do?  I make the 6th grader help the 4th grader.  Genius, I know.  I figure, it will reinforce what he should already know, he has far more patients with his younger brother at this stage of the day, and I can take 5 minutes to get a drink of water (cough me head off) and re-collect me thoughts!

So there you have it, solving the world's problems one day at a time :-)!


Wednesday, September 14, 2011

Tasty and stuffed

This weekend we were looking to try something different and tasty... off to the 5 Ingredient Fix list to see what looked like it would hit the spot.  Stuffed Pork Chops and Rice Pilaf, of course!  And boy was is GOOD!

Stuffed Pork Chops

Ingredients

  • 1/4 cup chopped prunes
  • 1/4 cup toasted slivered almonds, chopped, plus more for garnish
  • 3 tablespoons lemon olive oil
  • 4 pork loin rib chops, 1 1/2 inches thick
  • Course salt and freshly ground black pepper
  • 2 ounces goat cheese

Directions

In a bowl, mix the prunes and almonds with 1 tablespoon of lemon olive oil.

Cut a pocket on the side of each pork chop from the fat side to the bone. Season the outside of each chop with salt and pepper, to taste. Stuff each chop with 1/2-ounce of goat cheese, pushing it to the bottom of the opening, then stuff with the prune mixture. Secure with toothpicks.

Heat the remaining 2 tablespoons lemon olive oil in a large shallow Dutch oven over medium-high heat. Sear the chops on both sides until golden brown. Add water to come 1/4 of the way up the side of chops. Cover and simmer until the chops are cooked, about 15 to 20 minutes. Remove chops to a serving platter and simmer the liquid and any stuffing drippings until reduced to a thick sauce. Pour the sauce over the chops and serve garnished with toasted almonds.

Rice Pilaf

Ingredients

Directions

Bring the broth and water to a boil in saucepan over medium heat. Reduce the heat to low and keep hot.

In another saucepan, heat oil over medium heat. Add the scallions and cook for about 3 minutes. Stir in the rice, season with salt and pepper, to taste, and cook for another 2 minutes. Pour in the hot broth mixture and bring to a boil. Reduce the heat to a simmer and cover the saucepan. Cook until the liquid is absorbed and the rice is tender, about 20 minutes. Stir in walnuts and taste for seasoning, adjusting as necessary. Transfer the pilaf to a serving bowl and serve.

*Go... go now, get what you need to make this... and ENJOY!!!*

Monday, August 15, 2011

Ring, Ring, Ring

"Hello, yes, Paddy Wagon people, I'm ready for pick-up!"

Parenting is like living in an insane asylum! Every day you have no idea what to expect from your ward. They could be perfectly normal, or they could be living in fantasy land that day, or the naughty/angry personality has shown up (un-invited). Okay, some of you wonderful, loving, ultra patient parents are probably reading this thinking that I'm off my rocker for sure this time, and what business do I have parenting with such thoughts.

Well, to your first thought... YEP! To the second notion... I question that myself!

So what spurred on these thoughts today, of all days... Anybody notice it is Monday?! I dislike Mondays; the only Mondays that are good Mondays are Mondays at the beach otherwise I bite my thumb in their direction!

This Monday started off like any other Monday, up and breakfast in a quicker pace than usual because the boys have gymnastics (just the summer at this time) at 8:00am! Snooker is NOT A MORNING PERSON! After he finally finished his breakfast, got dressed and all the other stuff they do in the morning, he knew he needed to do stretches. I asked about one of them, he lied about it, I told him he needed to do it... then hit the restroom before we left. As he walked away from he muttered under his breath (I should mention here he has a terrible back-talk habit)... "You just Shut-UP!"

Daddio relayed the morning's events to a co-worker, and she said, How old was he? Notice how I used the past tense because I already assume he’s dead…”

Oh, Mondays... why must you be so cruel!?!


Tuesday, August 9, 2011

A few more new favorites!

So I've posted about our new obsession with 5 Ingredient Fix... oh how we love that show. Here are a handful of recipes we've tried, and LOVED!

First up Grown-Up Farmhouse Grilled Cheese


Ingredients

  • 8 thin slices pancetta
  • 8 slices brioche, about 1/2-inch thick
  • 4 ounces sharp white Cheddar, thinly sliced (recommended: Farmhouse)
  • 1 large heirloom tomato, cut into 4 slices
  • Kosher salt and freshly cracked black pepper
  • 3 tablespoons butter, room temperature

Directions

Preheat the oven to 425 degrees F. Set a rack on a rimmed baking sheet.

Lay the pancetta slices on the rack on the baking sheet and bake until crisp, 15 to 18 minutes.

Meanwhile, set your toaster to a low setting and toast the brioche slices, (they should be slightly dry but not brown).

Lay 4 slices lightly toasted brioche on a work surface and cover the slices with half the cheese, followed by a slice of tomato. Season each sandwich with a pinch of salt and a healthy grind of black pepper. Top each with 2 pancetta rounds and the remaining cheese. Lay the remaining brioche slices on top and press down lightly. Butter the top of each sandwich with 1/2 tablespoon butter.

Heat a large griddle pan over medium heat.

Melt the remaining tablespoon butter on the griddle pan and add the sandwiches, buttered side up. Cook until the bread is golden brown and the cheese is beginning to melt. Flip the sandwiches, press lightly, and continue cooking until golden and toasty. Transfer to a cutting board and slice the sandwiches with a serrated knife, on the diagonal. Arrange on a serving platter and serve immediately.


Then we had a little dinner party over here a few weekends ago and served Rosemary Pork Tenderloin.


Ingredients

  • 1/3 cup Dijon mustard
  • 2 tablespoons freshly ground black pepper
  • 1 tablespoon freshly chopped rosemary leaves, plus 4 sprigs rosemary, with hard woody stems
  • 5 large garlic cloves, 2 cloves minced, 3 cloves smashed
  • 2 pork tenderloins, about 1-pound each
  • 4 slices maple bacon

Directions

In a small bowl, whisk together the Dijon mustard, fresh ground black pepper, chopped rosemary, and minced garlic and mix well. Rub the mustard mixture over the surface of the tenderloins and wrap in plastic wrap. Marinate in the refrigerator for 1 hour.

Preheat oven to 375 degrees F.

Place rosemary sprigs and smashed garlic in the center of a roasting pan. Remove the plastic wrap from the tenderloins and top each with 2 slices of maple bacon. Tie with kitchen twine to secure bacon strips.

Place the roasting pan in the oven and bake for 25 to 30 minutes or until an instant-read thermometer, inserted in the tenderloins, registers 160 degrees F. Remove from oven when desired doneness is reached and let sit for 5 to 10 minutes on a cutting board. Remove kitchen twine, slice and serve with your favorite sides. Garnish with the rosemary sprigs and garlic. Enjoy!

Then it was Daddio's birthday last week and he requested fried chicken, mashed potatoes, and this delicious side dish: Homemade Creamed Corn


Ingredients

  • 6 slices bacon
  • 8 large cobs fresh corn, preferably white, shucked and cleaned
  • Kosher salt and freshly cracked black pepper

Directions

In a large skillet, (seasoned cast iron does well here) cook the bacon over medium-high heat until crisp. Turn off the heat and transfer the bacon to a paper towel lined plate. Reserve the drippings in the pan.

On a cutting board, cut the stalk ends of the corn cobs to make a flat surface; stand them up and shave the corn from the cobs with a sharp chef's knife. Return the skillet to medium-low heat, and add the corn kernels. With the back of the knife, firmly scrape the cobs over a shallow plate to extract as much liquid (milk) as possible and add it to the skillet.

Season corn lightly with salt and pepper and cook until broken down and creamy, about 30 to 45 minutes, stirring often; add water if the pan gets too dry.

Serve warm or at room temperature.

Note: Crisp bacon can be crumbled over the creamed corn when serving or reserved for another use. If you have bacon drippings on hand, use 1/4 cup for this recipe.

*This particular menu had me on my feet cooking for several hours... it was a huge job... but well worth it! The creamed corn was a huge hit!


Chicken and Greens

Sorry that I left you hanging, there... waiting to find out about this recipe that I posted on last!

It was SO GOOOOOOOOOOD! The chicken was so tender and flavorful! The greens where full of flavor and a wonderful texture and firmness!

I highly recommend it... go out, by the ingredients and make it this week!


Thursday, July 28, 2011

5 Ingredient Fix

I have a new favorite TV show... can you guess what it is? I'm sure you are either thinking it is food or crafting (based on the majority of my posts... it seems like)... it's FOOD! The show... 5 Ingredient Fix! It's genius I tell you... everything she prepares on the show has 5 ingredients or less (salt and pepper are not included in the count). So far EVERY SINGLE EPISODE we've seen has left us starving and desperate to try!

Well today I woke and decided that I could wait no longer! I spent some time on the recipes list trying to find things that I already had all or part of the makings for. Not a lot of luck. I had chicken... hmmmm, well, okay, what would I need to buy to make some sort of chicken? Oh, and we need a side dish...

What did I pick?

Citrus Garlic Chicken

Ingredients

  • 4 large bone-in, skin on chicken breasts, about 3 pounds
  • 4 large whole chicken thighs, about 2 pounds
  • 1/2 navel orange, zested, plus the juice of 1 whole orange
  • 2 limes, 1 zested, both juiced
  • 1/2 cup extra-virgin olive oil
  • 4 large cloves garlic, peeled and smashed
  • 1 teaspoon kosher salt, plus more for seasoning
  • Freshly cracked black pepper

Directions

Put the chicken in a large nonmetalic bowl. Put the orange and lime zests in a small bowl and add the fruit juices. Whisk in the olive oil, garlic, 1 teaspoon salt, and a generous grind of black pepper. Pour the marinade over the chicken and toss until well coated. Marinate for 20 to 30 minutes but no longer than 45 minutes.

Preheat the oven to 375 degrees F. Put a rack on a rimmed baking sheet. With tongs, remove the chicken pieces from the marinade and arrange them on the rack leaving space between each piece. Drizzle a small spoonful of the marinade over the top of each chicken piece; season well with salt and pepper, to taste. Roast until the chicken is cooked through and the juices run clear when meat is pierced with a knife, about 45 minutes.

Transfer the chicken to a serving platter. Cool slightly before serving or let stand until room temperature before refrigerating for later use.


-AND-
Nutty Greens with Bacon

Ingredients

  • Kosher salt
  • 1 pound haricots verts, trimmed
  • 3 slices bacon
  • 4 ounces blue cheese, cut into small chunks (recommended: Shropshire)
  • 1 1/2 cups toasted whole pecans, coarsely chopped
  • 1/4 teaspoon freshly ground black pepper

Directions

Bring a large pot of salted water to a boil over high heat. Add the haricots verts and cook for about 2 minutes. Remove the beans from the water and immediately place in a bowl of ice water. Remove the haricots verts from the ice water and set aside in a medium bowl.

In a large saute pan, over medium heat, cook the bacon until crisp. Remove the bacon and place on paper towels. Add the beans to the bacon drippings and cook over medium heat for 2 to 3 minutes. Add the blue cheese and toss just until it starts to melt. Break the cooked bacon into bite-size pieces and add to pan. Finish by stirring in the toasted chopped pecans. Season with the freshly ground black pepper and just a tiny pinch of kosher salt. Serve immediately.

--------------------------------------------

I'm super excited for tonight... oh and I made chocolate pudding for dessert...YUM! I'll let you know how it all turns out!

Sunday, July 17, 2011

This means war!

Generally I'm not a confrontational person. I won't say anything, I will simply let things fester! Oh how I let them fester, until one day I can't take it any more and ... boom! Granted this is a character fault I've been working on, and it has gotten better over the years... but it is still a thorn.

Now, when I'm having to deal with businesses, this can be tricky. Years past, I simply burned bridges and damned things to hell, never to return to said businesses... but I've learned patience, and that generally the people I'm dealing with are morons whe have no clue and the IQ of my 8 year old and really can't be held responsible. So you have to find the right channel in order to get things done... CORPORATE!

Enter in my current issue... medical bills. Ever since the boys came home, this is a monthly battle for one reason or another... but it all boils down to dr/lab not billing the boys' secondary insurance! I end up spending HOURS per phone call trying to get it resolved... even though they take all the information the day of the appointment (or even before that)... even when we've been there before and all they do is make another copy of the same info... I still end up getting bills that were never filed correctly. It is infuriating. Usually I just make the calls... set my cell on speaker and keep on doing the boys school work, or cleaning house, or folding laundry... whatever, you get the picture. This year I decided to try a few new things.

I'm currently in a stalemate over an appointment back on the second week of January. Every time we use this office, and this lab we have this problem. I know, I haven't learned... but this is Bobcat's endo, and I just didn't want to switch because I knew that we would be tapering off the visits because he was seeing his gastro to take care of the CD. Now I finally resolved the bill with the office after 3 very long waiting phone calls, and then one very to the point email which made it to the director of billing who called to apologize. Sweet, taken care of. I used the same approach with the lab... but to no avail. This morning marked the 5th bill, and the 5th time I contacted them. The first three times were by phone. Each wait time to get an operator was well over an hour! So on the four time I went to their website and left a message on their inquiry form (June 15th) with my phone number and the list of dates I had already spoken to them. NO RESPONSE! This morning, I did the same thing.

After I hit send, my blood was boiling and the wheels in my brain where just a' spinnin! I think a new plan of attack needs to be waged... THIS IS WAR! Since they won't listen, or respond to my once a month calls/emails... I will now log on to their site EVERY MORNING, and send the same inquiry simply adding on the new date to the list. Surely this will get some response, right?

If I had a nickel for every minute I've had to spend on the phone for insurance billing issues in the last 7 years with the boys... I would be able to buy the beach house of my dreams!

Tuesday, July 12, 2011

Tryin' somethin' new!

I'm stepping out on a limb this summer, and trying something new... there is little risk (I guess), and the opportunity to have a little fun. Well, fun for me that is :-).

First, I've started up a second blog. Why??? Well, this blog really is meant to chronicle our life... not my ever growing need to sit behind a sewing machine! So, I've decided to carve out a little world of crafting next door at: Sewn Escape! This way for those who come here to find out about adoption, homeschooling, our Catholic faith within our family... all the normal stuff we write about here... that's what you will find. If you aren't interested in all the crafty stuff, you won't be bogged down by weeding through the posts that aren't for you.

If you like that sort of thing... come on over!

My second project, which sort of goes hand in hand with the first, is I've decided to open my own Etsy shop, Honey Bee's Shoppe.

So there you have it... Momma Llama's summer o' fun!

Wednesday, July 6, 2011

One Eye Open

After the shocking (but somewhat completely expected, after the initial accusations in March) news broke on (ex) Fr. Corapi, I didn't think the day could sink any lower... WRONG! Food, glorious food, strikes an unhappy note in the house.

If you've read this blog for any length of time you will know that Bobcat has Celiac Disease. The long of the short of it is that he can't have gluten (a protein found in wheat primarily). Back before he was diagnosed, we had no idea. He didn't have the most common signs, at least to our untrained eye, and his long time suffering was something that he thought was just normal. Even after the initial diagnosis before the biopsy I was quite skeptical that he had it... to me it just didn't make since.

Here's the thing about CD, it just doesn't seem real on paper. Every symptom could easily be associated with something else, and no two CD suffers are the same (regarding symptom presentation). Even though we now live in this world of gluten-free eating, I can totally understand outsiders not understanding the struggles or even the need for it. And in some ways the fad to be GF just because (while it helps with labeling food) takes away the seriousness of it for those who actually suffer.

So what's the biggest problem for CDer's needing to be GF? Contamination (or cross-contamination)! Here at the house, obviously, we are able to control the environment and be very selective about what we buy and how I cook. I would say that 99% of the time when I serve a meal it is ALL GF. There are occasions when this isn't the case, and last night was that sort of situation. We were having sloppy joes. I bought regular buns for everyone else, and had GF bread for Bobcat. When I went to fix Bobcat's portion, Daddio thought I went a little heavy on the sauce, and so I scooped some out and put into another boy dish. Well, when I did that some of the GF bread ended up in the other dish... along with the wheat bun... so at a glance you saw GF bread, not the bun (we do ours "open face" style and eat with forks...).

You see where this is going, right?! While I was busy working on getting cups filled and other plates made, I wasn't the one passing out the food dishes, and never saw that Bobcat's dish didn't end up in front of him... I also don't sit across from him, so I didn't notice his dish while he ate.

So what happens to a boy with Celiac Disease who eats a regular bun????? When it hits his digestive track his body freaks out! Poor kid was SICK! And we're not talking the "my tummy doesn't feel well because I ate too many sweets", oh no, it is more like the "MUST GET RID OF ALL TOXIC MATERIAL UNTIL THERE IS NOTHING LEFT THAT COULD POSSIBLY HARM ME, AND THEN SOME MORE JUST IN CASE!"

The lesson here for us is that he still has CD, and he does have a violent reaction (it's been two years since the last time he contaminated himself... vanilla wafers can be a really strong temptation when no one is looking)... To anyone stumbling on to this post, when someone says they have CD and need to be GF, BELIEVE THEM!

As for me... today is going to be low key. When a mom has a sick kiddo, we sleep with one eye open listen for the horrid sound... which means I've had little sleep! Bobcat is a little on the dehydrated side, and his stomach hurts (all those muscles are currently on strike, and I know how he feels having had that sort of a reaction a few times in the last few years due to medications it turns out I'm allergic to). So he will most likely be spending time on the couch snoozing, reading, and hydrating. The other two knuckleheads are going to try their best to stay calm for the day... TRY being the operative word!

Fun times...

Wednesday, June 29, 2011

Sew much to do...

When I start titling posts in a corny manner, you've lost the battle for sanity :-)

Over the weekend we had a very rare treat... NO KIDS! My MIL took the boys over night Saturday so that we could play an out of town concert with our band. That afforded us a date night Saturday night after the long drive home (we saw a movie that started at 10:15pm... CRAZY), and a leisurely Sunday. We went out to breakfast, and then went shopping just for fun (well, and for groceries... but that wasn't the fun part, okay it sort of was fun to be able to actually shop for groceries instead of attempt to follow your list, while throwing things in the buggy in a sort of careless manner while answering a million questions and telling boys to get out of other shopper's way!).

Anyway... after all the practical stuff, we ended up at Tuesday Mornings. Mostly we were in search of a little 'Thank You' gift for my MIL for keeping the boys... but of course, one must always keep an eagle eye out for the perfect thing you never thought you needed ;-).

Who knew they would have a stash of fabric... NOT THIS GIRL! But lo and behold they had a little crafty section that had jelly rolls a few fat quarter bundles. I found a great fat quarter bundle for $5 (8 fat quarters where in the package)... and, well, I just couldn't pass it up. Here is a shot of the fabrics included:
If you've stumbled across my blog as of late you will know the love I have for pouches, purses and the like... and my new love for sewing them (thanks to great patterns I've found online). Today was a day to sit at the machine... I NEEDED it. The boys and I have gone round and round lately, my hands needed an activity and the boys needed to go outside and play (which they asked to do right after they got their dishes put away from breakfast)... prayer granted!

What to sew, which pattern to follow, which fabrics would I pull together... did I have any more zippers??? I spent some time looking through my Pinterest account, and finally decided that while I really liked the Gathered Clutch from Noodlehead, it wasn't exactly what I wanted. I wanted something larger so that my wallet would actually fit in there (I'm not one for always taking things apart from one purse to the next... I just want to take my wallet and notebook out, and transplant it to the next bag, I'm less likely to wander off without something I actually need). After a lot of looking and figuring I decided to alter the gathered clutch pattern, and work from the tutorial on gathering here (my last two were not gathered, but pleated because I became irate with how I was gathering).

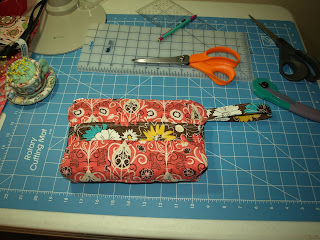
I enlarged the dimensions so that the pre-sewn numbers were 11x8, and also made a little wrist strap. Here is a shot of the inside panel with the card holder. I really love that yellow material (even though I am not a huge fan of yellow... I really like the butterflies that have the pink flowers from the outer fabric in them).


The other big change I made in this bag is that I notched the corners so that it would have a flat squared off bottom. It's cool, with the wallet inside it actually stands up!
I am totally digging this little clutch...


Friday, June 24, 2011

What I've been up to...

Yesterday and today I had a chance to spend some time at my sewing machine...

Here's what I put together: Gathered Zipper Clutch

I know they look similar (they are different), they are a little different... you'll just have to take my word for it :-).
I really like them! I also really like the pattern for the most part... yep, I did make some changes, and plan to make even more changes when I have time to make more... but the concept is great (and easy to follow).

Alright, I must run, we actually have a sitter tonight so we can attend a friend's birthday... shocking to have a sitter, and the time to socialize... CRAZY!

Tuesday, June 21, 2011

Mattress pad woes

So a few months ago I replaced our old mattress cover. The first one lasted 10 years... I was hoping to get a good run out of the new one. Now I haven't a clue how much we spent on the first one, but I didn't think it was all that much. So when I saw this one for $25 I figured that was a good price and I would pick it up. Well, within the first month it began to tear around the sides. I was ticked off, and every time I washed it and put it back on, the tears would get a little bigger... ANNOYING!
So last night, while I laid in bed wide awake (thanks to the thunder, lighting, and hail) I thought about ways to fix it without spending any more money. Then it came to me, I have old sheet sets that fit our bed, but are far to pill-y to use any more (usually I pull them out for camping). Hmmm, if I cut out the middle of the fitted sheet, cut off the crappy stuff on the mattress cover, sew them together... in theory I would have solved my current problem!

So off to work I set this morning...

Once I had to two pieces I wanted, I pinned right sides together (on the bed, it was much easier to work with it that way)...
Once I had it all pinned, I carefully removed it from the bed (I can't stress enough the careful part, good grief...) then brought it over to my machine and seamed it up (you're looking at the wrong side here).
I decided after I looked at it for a while that I wanted to reinforce that seam... I knew I would be tugging and pulling on it often with all the washing I do. So I went back over on the right side with a zig zag stitch.
Perfection... well, maybe not perfection... but WAY better than a ratty torn up mattress cover. And boy does it stay. The fitted sheet I used was a nice snug fit on our large mattress... so no more sliding about under our sheets!

So there you have it... now when your sides start to pull away, here is a no cost solution!


Happy Father's Day


I hope everyone had a wonderful Father's Day. From what I gather from Daddio, he was pleased with his day!

Every year the kids and I do something different. Sometimes it is a store bought gift, sometimes it is a handmade gift. This year, Daddio actually made a request... so obviously we went that direction with it. He had space on his desk to display something that the boys could/would make... hmmmmm, what to have the kids make???? That's always a brain teaser! After a lot of thought I decided to go with a painting. It's been a while since they've done any real painting, and now that they are older and doing a lot of drawing I thought it was time to step up their painting.

First they needed to draw out on paper what they wanted to paint... including coloring so they had a good feel for the design. I tried to remind them that little details would be difficult to translate on to the canvas for them (ie, maybe consider a more modern art approach... yeah, they weren't having it). The only thing I did have to put my foot down about was Kung Fu Panda. We took them to see it a few weeks ago and now everything they draw is KFP (even on their Father's Day cards, I realized that most of them contained KFP).

So here are the boys after they had designed their pictures and were starting to get them down on to the canvas.

Bobcat

His completed painting:

Bubba

His finished product:

Snooker

And his finished product:
I have no idea why his aircraft carrier, that is in the water, is green/brown camo... I guess he just likes camo, even though it makes no sense for a water vessel!